- Email:
[email protected]
Phone:
+918010117117
StoreHippo Help Center
StoreHippo Help Center
Creating custom forms
Mr.Rajiv kumarOn several occasions, you might need to create custom forms to capture user input from your customers for marketing, auditing, data analysis or other purposes. StoreHippo allows you to create custom forms and use them in store themes and on static pages.
Go to Site > Forms section in StoreHippo Admin Panel to create a custom form. Click on Add New button in the top right corner. The following window appears with the fields described below:
Name
Enter the name of the form.
Fields
In the fields tab, enter the details of the fields that are part of the form. For each field, please enter the following subfields.
Field Label
Enter the label of the field that will be visible to the customer.
Field Name
The field name is the name by which data for the given field is stored.
Type
The field type is the edit/display type of the form field, e.g. text, select, radio etc. Following are the available values of the field type:
Standard Field Types
- text
textarea - file
- select
- checkbox
- radio
- password
- date
Following are the special field types available:
- country: Shows all countries in the dropdown list.
- state: Shows the states of the selected country in the dropdown list.
- widget: Allows you to specify a theme widget name that can be used to build custom form fields. The widget must be present in the theme.
- phone: Allows phone number validation by the selected country. E.g. +917894561230 is valid in India +17894561230 but not in
USA . - captcha: Shows captcha on the form.
Field Settings
Next to each field, a gear icon is provided to edit the settings for the field. Field settings allow you to edit the field properties. Clicking on the settings gear icon against data type lets you define the settings of the field.
Validation
Validation field allows you to define the validation rules for the field. You can define more than one validation rules for a field. Following are available validation rules:
- callback
- no_dot
- numeric
- boolean
- min_length
- max_length
- greater_than
- less_than
- match_other_field
- greater_than_field
- URL
- function
- valid_chars
- zip_code
- regex
Required
Check this setting to make the field as required.
Hidden
Check this setting to make the field hidden in the add and edit forms.
Read Only
Check this setting to make the field as read-only field.
Field Groups
This field enables you tag the added fields in under the respective FIELD GROUP. Provide the name of the field group here. For example, you have created two field groups "Login Information" and "Personal Information" in the Seller Registration form and added fields in that. The fields will be grouped into their respective Field Groups and will be displayed as shown in the image below.

Show on
Provide the field and value here, if you want to make this a sub-field of a field.
Placeholder
It defines the placeholder for the field in the forms.
Default
Specify the default value for the field if no value is passed.
Settings
In the settings tab, you will see the following fields:

Title
Enter the title of the form.
Description
The description can be displayed below the form title to brief user about the form while rendering the form. You can include instructions for users on how to fill the form in the description.
Actions
Actions field allows you to choose the actions that will be performed when the user submits the form. Currently, there are two types of actions allowed.
Save Data: The data is saved when a user submits the form. You can view the
Send Email: Email is sent when a user submits the form. You have to specify the mail notification template, sender and receiver when you chose this action type.
In mail notification, you have to specify the variable as per your specified field_name.
- Mail template: Name of the mail notification to be sent. The name of the template and variables should be the same as mentioned in the notification template.
- Receiver Email: Email id of the receiver email.
- Attachment fields: Name of the field(s) having file type, which you want to send as an attachment in the email. If there are multiple attachment fields, use a comma to separate them. eg. "pan card,aadhar_card". Please note that .exe,.mp3,.zip are not supported.
Data
When you select Save Data as the field action type, then the form data submitted by the user can be seen here.

- Click the export button to export the data in CSV format.
- Click on the gear icon to view the raw data.
- Click on the delete button to delete a particular record.
Setup Notification
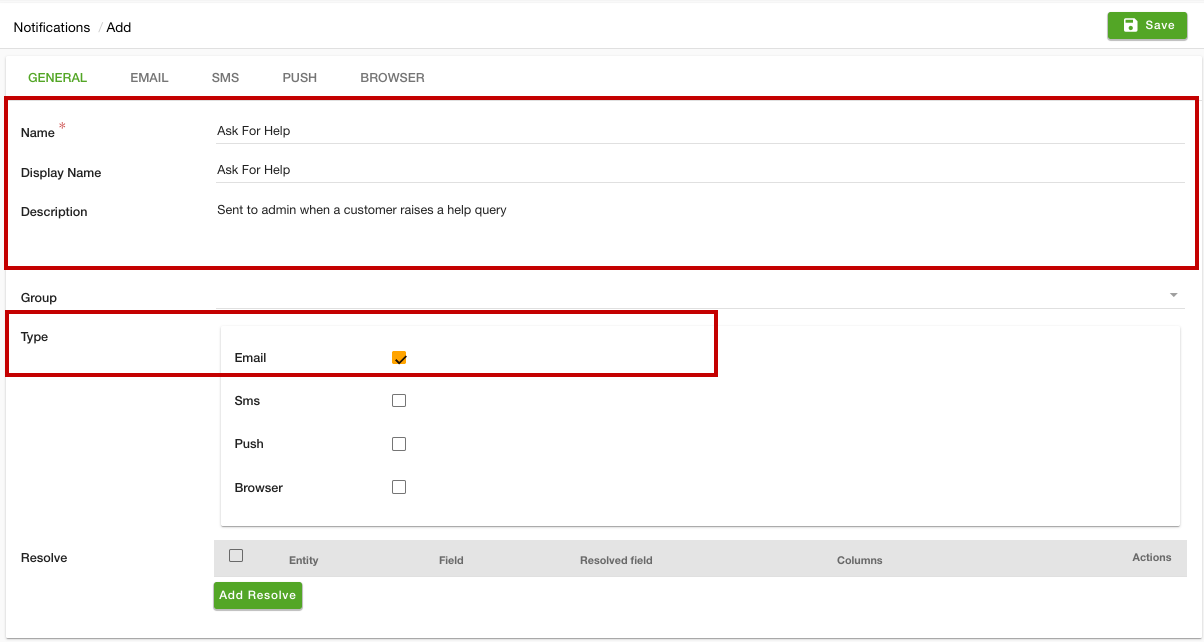
If you want to send a notification (Email/SMS) when somebody fills the form, you can configure a new notification or use an existing one. To set up a new notification, follow the steps mentioned below:
- Go to the Settings > Notifications section in the StoreHippo Admin Panel.
- Click the Add New button. A new form will open up.

- Provide the Name, Display Name, and Description.
- Select "Email" in the Type field.
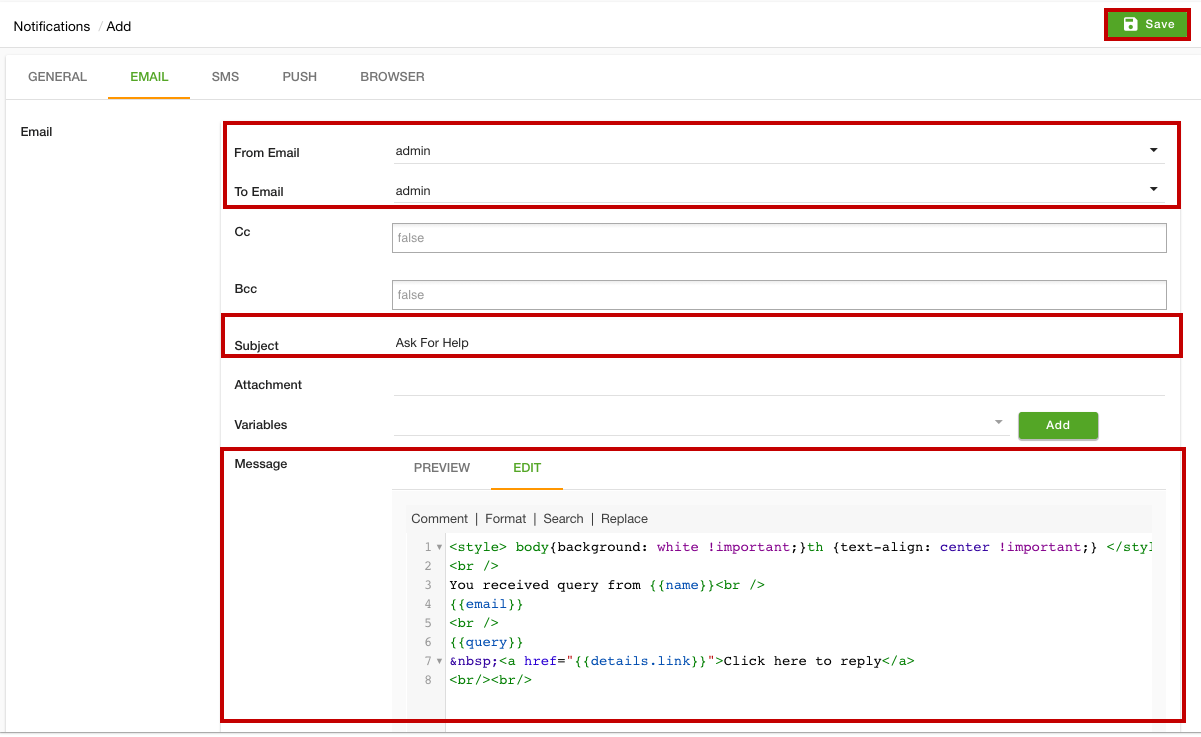
- Click the Email tab.

- Enter the From Email, To Email, and Subject.
- In the Message field, add the template.
- Click the Save button to apply the changes.
Now, whenever the user will submit the form an email will be sent to the admin as a notification. Similarly, you can add SMS notification.
* Custom notification can be configured from Enterprise plan onwards.
FAQ
You can display the form title on the storefront using the following code:
<div ng-bind-html="ms.forms.formname.title"></div>You can display the form description on the storefront using the following code:
<div ng-bind-html="ms.forms.formname.description"></div>


