StoreHippo Help Center
StoreHippo Help Center
call to replace anchor tags contains '/admin' in href
Example
2018-09-26T07:43:19.036Z
2021-07-26T11:49:51.450Z
How to provide option to select substores on pop-up?
Mr.Rajiv kumarScenario
Suppose, you want to create individual substores for 4 different cities. Now, you want the user first to select the "City" from the popup and then access the given substore.
Example

Steps
StoreHippo multi-store ecommerce platform allows you to set up multiple substores within a store to offer a different storefront as well as products, layout, and payment options, etc. to users. Follow these steps to create individual substores for different cities:
Enabling MultiStore
- Go to Settings > MISC section in StoreHippo Admin Panel.
- Select the Enable Multistore checkbox to enable the multistore e-commerce functionality.

- Go to the Settings >Substores in the StoreHippo Admin Panel to create substores.
- Click the Add New button.

- Provide the Name of the substore as 'Delhi'.

- You can provide the image, sort order, and other settings of the substore if you want. Click on the Save button and the substore will be created.

- You can create various substores by following the same procedure.

Setting up default substores
- You might also want to select the default substore for your store. When the customer lands on your store the default store will be the first store that is displayed. To do this, go to Settings > MISC section in the StoreHippo Admin Panel.
- Select the default substore from the dropdown.

- Now, you need to define if you want to show or hide the substores when no substore is assigned to the records. Select hide or show in the Records With Blank Substore field.
- Click on Save to save the settings.
Linking products to substores
- Now, you need to link your products to the substores to show them in the substores.
- Go to Products > Products section in the StoreHippo Admin Panel to specify substore in a product.
- Edit an existing product and provide the name of the substore/substores to which you want to assign the product in the Substore field.

- You can do the same for categories, brands, collections, banners, and sliders.
Choose Substores as a
pop-up window - Go to the Site > Startup Widgets section in the StoreHippo Admin Panel.
- Click on Add New button to create a
startup widget. - Provide the Name of the widget. In the Controller field, add the code mentioned below as shown in the screenshot below:
function ($rootScope) {
     if ($rootScope.ms.user && !$rootScope.ms.user.store) $rootScope.ms.modal('multistore');
}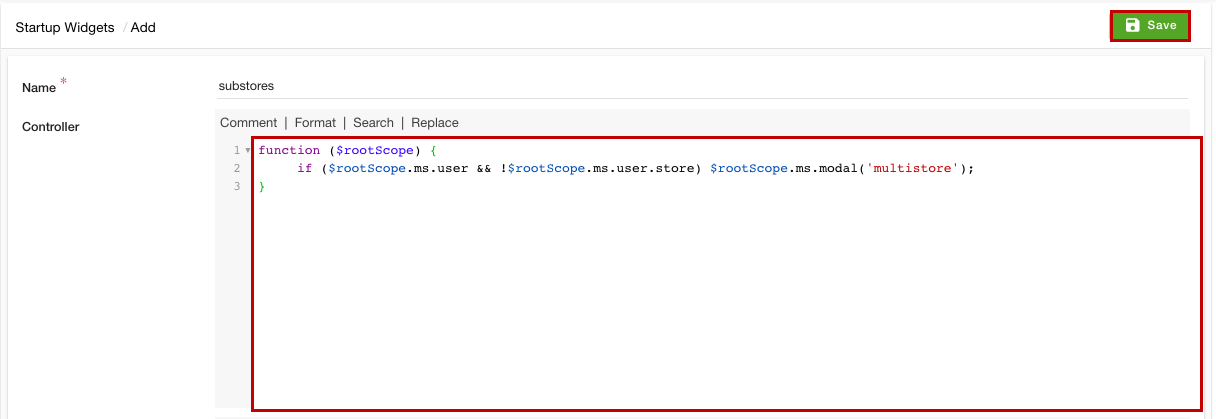
- Click the Save button.
- The option to select substores will now appear on your storefront.

- In theme, you can change html for substore link like:


<a ms-widget="ms.modal" data-msd-widget="multistore"> <span ng-show="ms.substore.name">{{ms.substore.name}}</span></a>

