Helpcenter +918010117117 https://help.storehippo.com/s/573db3149f0d58741f0cc63b/6969f0c18a8568e4561210d8/storehippo-logo-500-1--480x480.png" [email protected] https://www.facebook.com/StoreHippohttps://twitter.com/StoreHippohttps://www.linkedin.com/company/hippoinnovations/https://plus.google.com/+Storehippo/posts
B4,309-10 Spaze iTech Park, Sector 49, Sohna Road, 122001 Gurgaon India
Create a Trial Store StoreHippo.com Contact Us
- Email:
[email protected]
Phone:
+918010117117
StoreHippo Help Center
StoreHippo Help Center
call to replace anchor tags contains '/admin' in href2017-05-17T09:44:24.698Z 2025-05-07T08:27:16.983Z
- Home
- Creating Mobile App build
- Set up Google Login for mobile app
Set up Google Login for mobile app
Mr.Rajiv kumarBefore you can integrate Google Sign-In into your website, you are required to have the Web client ID. For that, you must create a Google Firebase Console project.
The google login integration for the Android app and IOS app differs. Follow the below steps to integrate the google sign-in to your app.
Note: If firebase project is already setup skip Creating a Project step. If the required app is already created then skip the Creating a Project and Creating an Android Project or Creating an IOS Project and follow Adding SHA-1 When The Project Already Exists for Android and Skip all the steps before the Enabling Sign-in method for IOS.
Creating a Project
- Go to Google Firebase Console.
- Click on Create a Firebase project.

- In the next window opened, Enter the Project Name in the project name field and click continue, based on your requirement choose the things you want to configure.

- Once all the steps are done your firebase project will be created.
- The Firebase dashboard is then displayed as follows.

Creating an Android Project
- In the Firebase dashboard, click on the Android icon to create an android project.
- In the next step, you are required to register your app.
- Enter the package name of your app which you can find in the Mobile App section in the StoreHippo Admin panel. It should be in the format com.storehippo.appname.

- Provide the SH-1 certificate. In case you are using StoreHippo inbuilt Android build then enter the SHA-1 as 15:27:AE:98:AA:0F:93:05:4F:
6A:1E:F1:99:1E:88:D9:33:29:AA: .AE - Click on the Register app button.
- Now, download the configuration file and click on Next.

- Click on next and Skip the steps.
Creating an IOS Project
- In the Firebase dashboard, click on the IOS icon to create an android project.
- In the next step, you are required to register your app.
 Note: The Apple bundle ID must be same as the identifier associated with the provisiong profile of your app in the apple developers account.
 - Enter the IOS Bundle name and click on the Register app button.
- Now, download the configuration file and click on Next.

- Click on Next and Skip the steps and continue to console.
Adding SHA-1 When The Project Already Exists
- Follow this step only if the Android project is already created.
- Go to the firebase console and navigate to the project settings.
- In the General tab scroll down to the Your Apps section.
- Add the SHA-1 in SHA certificate fingerprints field.

Enabling The Sign-in Method
- Now, in the firebase dashboard, go to the Build section.
- Click on the Authentication and go to the Sign-in method tab. All the available sign-in providers are listed here.

- Go to Google sign-in and enable it.

- For android click on the Web SDK configuration and copy theWeb client ID.Note: For IOS you do not require the web client ID. After enabling the google sign-in download the latest GoogleService-info.plist file. Open the file and copy the CLIENT_ID and use it in place of the Web client ID.
- Go to Mobile Apps > Mobile Apps in StoreHippo Admin Panel.
- Add/Edit the mobile app.
- Go to the Social Login tab.
- In the Google log-in settings, enter the Web Client ID.

- Click on Save and Rebuild/Create the App.
Note: Once the google sign-in is enabled the respective google service file will be updated for both the IOS and Android project (google-service.json for android and GoogleService-info.plist for IOS). You need to upload the updated files in the storehippo admin panel by navigating to Mobile Apps > Mobile Apps in StoreHippo Admin Panel. Then, Add/Edit the mobile app, go to the general tab and upload the files under Google Services Settings.
Changes to be made to after publishing the app
Google Firebase re-signs your app with a new key on publishing. You must update your mobile app with the new signing key for the Google Login to work on your published.
Following are the steps only for Android.
https://play.google.com/console/developers/app/keymanagement
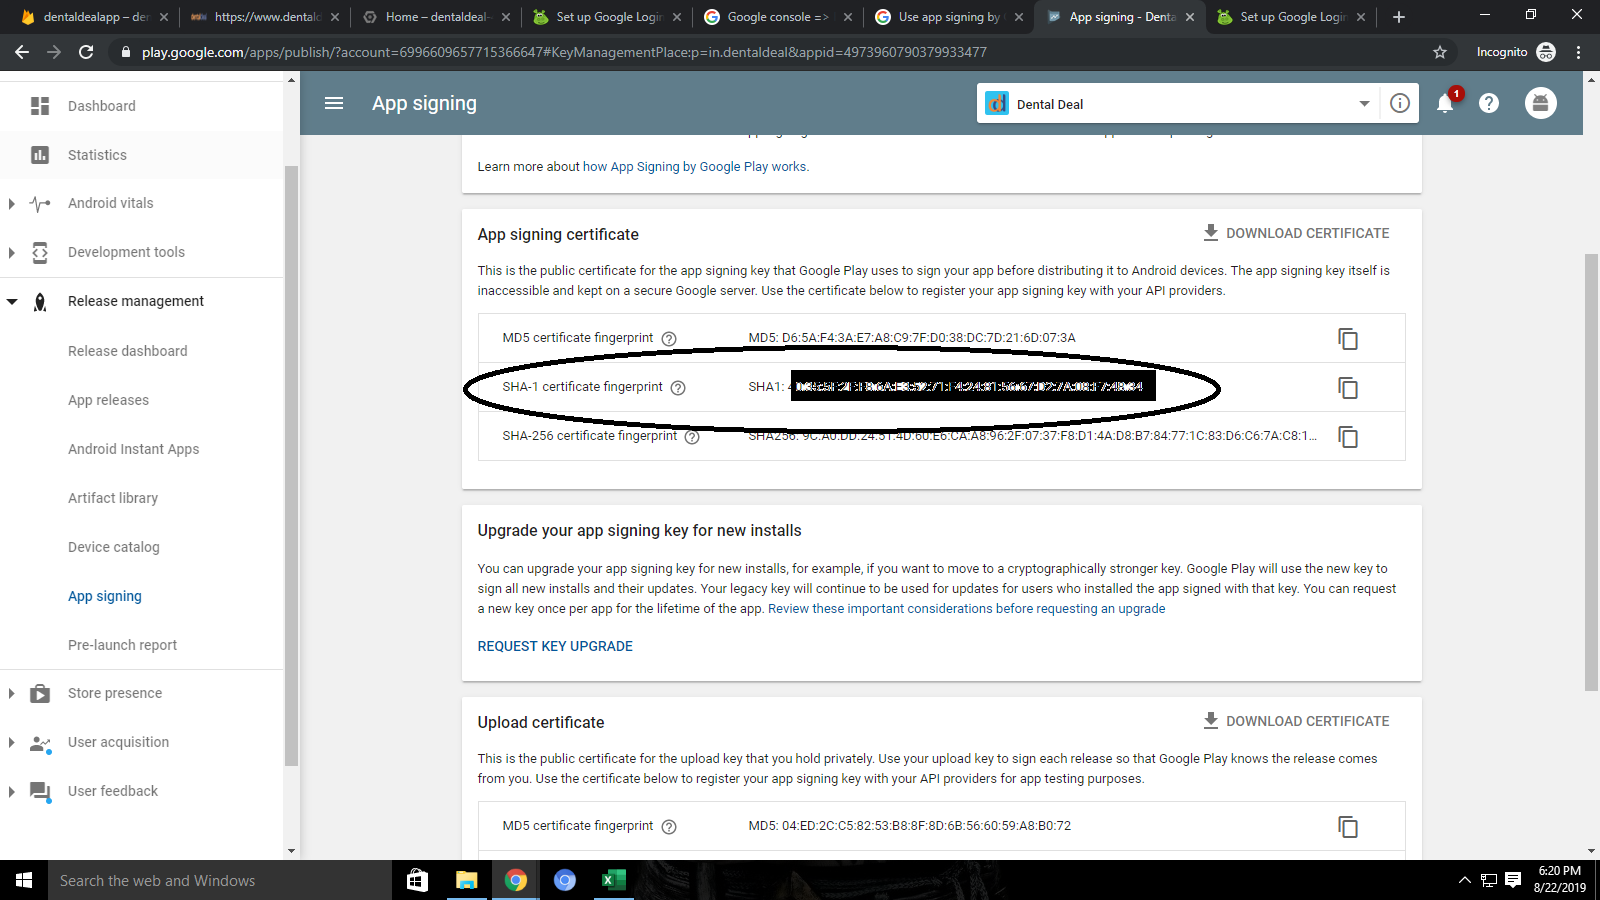
- Go to Google console => Release Management => App signing => App signing certificate.
- Copy the SHA Fingerprint (as shown in the image)

Go to your app settings on Firebase and add the SHA Fingerprint key.
You should be able to use Google Login on your published app now.


