StoreHippo Help Center
StoreHippo Help Center
Setting up Paytm as the payment gateway (New Version)
Mr.Rajiv kumarStoreHippo has integrated the API of the new version of the Paytm payment gateway. Paytm offers a wider choice of payment options and facilitates you to receive payment from QR code, links, UPI, subscriptions, Online, instore, and so on. Paytm provides an easy and secure way to make payments. It offers simple processes, flexible conditions, and also accepts high-risk merchants.
Register for Paytm Merchant Program
First of all, you need to register for the Paytm business program. To register for Paytm business, visit the Paytm business and register yourself by clicking the Signup button. 
If you already have an account, proceed with the next steps.
Generating API keys
After you have registered for the Paytm merchant program, you need to generate the API keys. To generate the API keys, follow the steps mentioned below:
- Log into the Paytm Dashboard.
- Under the Developer Settings, click on the API Keys option.

- To generate a key for the Test mode, simply click the Generate Key button.

- But, to generate a key for Live mode, you must activate the account first by submitting the required document and then click the Generate Key button.


Note: Users must generate separate API Keys for the Test and Live modes and no charges would be levied in case of Test mode.
Integrate your StoreHippo store with Paytm
After you have got the API keys, you can proceed to set up Paytm as the payment method in your store. Follow the below steps to set up Paytm as payment methods:
- Log into your StoreHippo Admin Panel.
- Go to the Settings > Payment Methods section.

- Click the Add New button. This will open up a form.
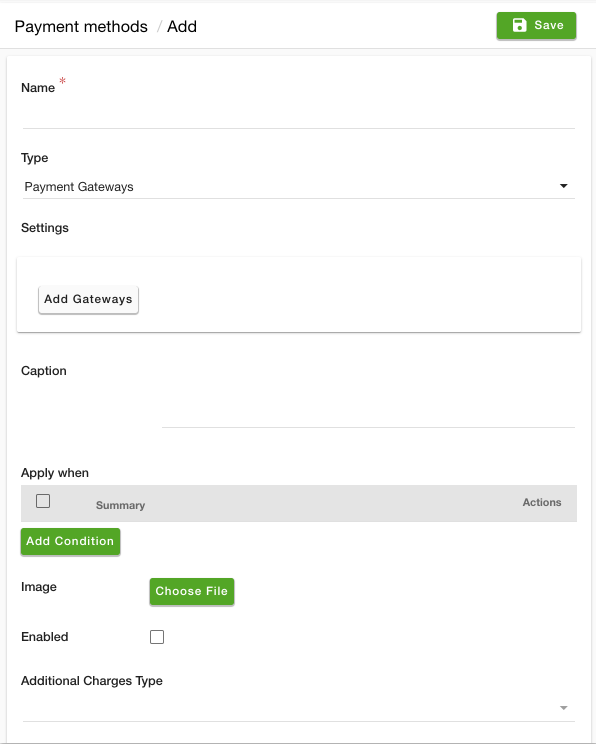
- Enter the name of the payment method in the Name field
- Select "Payment Gateways" from the Type dropdown.
- Click the Add Gateways button and select PaytmNew from the dropdown.

- Fill in the following credentials in the Account information form:
- Merchant Id - Enter your Merchant ID. Merchant ID or MID is the unique identifier issued to every merchant.
- Merchant Key - Enter the merchant key provided by Paytm. This is a unique secret key used for secure encryption of every request. This needs to be kept on the server side and should never be shared with anyone.
- Website - Provide the merchant identifier provided by Paytm.
- Hostname - Enter the channel ID provided by Paytm.
- Website - Provide the website name. This parameter is used to support multiple callback URLs to post the transaction response. Each URL needs to be mapped to a website parameter.
- Industry Type - This is part of the bank and pay mode configuration done with respect to an account.
- Enter the caption for the payment method. This will be displayed on the checkout page.

- Provide the condition for the payment method if required.
- Upload the image for the payment method. The same image will be displayed on the checkout page.
- Select the Enable checkbox to enable the Paytm payment gateway on your website.
- From the Additional Charges Type, select the type of additional charge that you want to apply when the Paytm payment method is selected.
- In the Sort Order field, you can define the sort order of the payment method.
- Click the Save button to create the payment method with the Paytm payment gateway

Paytm old version
If you are on the old Paytm version, you can integrate that as well into your store. Click here to know how to set up the previous Paytm version as the payment method in your store.


